Monday, October 27, 2008
Mommy and Me Workshop
Emails went out to everyone but I wanted to post here just in case you didn't get the email (just email me and let me know). I have changed the location for the November 1st Mommy and Me workshop. I decided to hold it at my mom's house. There will be more room for us. I'm so excited about the workshop!! I'll see you all there.
Thursday, October 23, 2008
Chicken Tenders with Honey Mustard Sauce
Here is the recipe that I promised those that were at club on Tuesday night. Enjoy!
Chicken Fingers with Honey Sauce
Shared by: Joel Italiano
5 Points Per Serving
12 ozs. skinless chicken tenders
2 Beaten egg whites
1 tablespoon honey
2 cups cornflakes, crushed
1/4 teaspoon pepper
1/4 cup honey
4 teaspoons prepared mustard or Dijon-style mustard
1/4 teaspoon garlic powder
1. Rinse chicken, pat dry with paper towels. In a small mixing bowl combine the egg whites and the 1 tablespoon honey. In a shallow bowl combine the cornflake crumbs and pepper. Dip the chicken strips into the egg white mixture. Roll in the crumb mixture to coat. Place in a single layer on a ungreased baking sheet. Bake chicken in a 450º oven for 11 to 13 minutes, or until no longer pink. 2. Meanwhile, for sauce, in a small bowl stir together the 1/4 cup honey, mustard, and garlic powder. Serve with chicken.
Makes 4 servings
Calories 230 Total Fat 2g Fiber 1g Sodium 275mg
Mommy and Me Workshop order
The workshop orders are in and I'm passing them out to those that I can. Chrissy, maybe Dave could come over and get yours? Your stamps are cute!!!
Candi
Candi
Monday, October 13, 2008
Upcoming Mommy and Me workshop...
I believe I'm going to be holding this workshop at my mom's house due to the overwhelming response of people who want to come to this one. I am so happy at how many are interested in this. I will send out a confirming email with directions when it gets closer to the time of the workshop (November 1st).
Su Color Combo
If you look over to the right, I have added a new color combo button. This is a site that you can put in a color (or series of colors) and it will generate a bunch of Stampin' Up color combos that work well together. This is a great site to bookmark (or just remember it's on here. I will keep this one on the blog for as long as the site is available). Let me know how you like it.
Monday, October 6, 2008
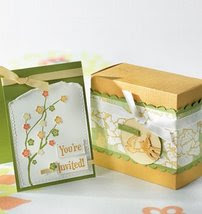
Mommy and Me Stamp Camp Projects
Here are the projects that we did at stamp camp and the how to's for those of you who might be intersted in making some of the projects:
Giant Paperclip Bookmark
Supplies: Giant Paperclip (from Staples or Office Depot)
Cardstock (Only Orange, Whisper White and Basic Black)
Batty For You Stamp Set
Punches (1 1/4" Circle Punch, 1 3/8" Circle Punch, Scallop Circle Punch)
Basic Black ink
Large Glue Dots
Adhesive
Stamp your chosen stamp from 'Batty For You' onto your Whisper White Cardstock and punch out with your 1 1/4" punch. Then punch out an orange circle from your Only Orange cardstock with your 1 3/8" punch. Finally punch out 2 black scallop circles. Build your "flower" starting with your scallop circle on the bottom, then your orange circle and on top is your stamped image. Adhere them together. Put a glue dot on the paperclip and adhere your scallop circles.
Bag-a-lope
Supplies: Envelope
Paper Trimmer and scorer
Stampin' Around Handle
Stampin' Around Wheel Cartridge
Wheel (note the size of the wheel)
Stampin' Around Wheel Guide
Adhesive
Cut off the top of your envelope (about 1/8th of an inch). Score the remaining three sides at 1". (remember do not push too hard or you will tear the envelope) Turn the envelope over and do this again. Apply a strong adhesive to the flap of the envelope to ensure that it doesn't open. Now you need to stamp on your evelope with your wheel. Do this on both sides. Once the ink has dried you need to fold over on your score lines. Fold your score lines both ways. Next put your hand inside the envelope pushing it so it opens up. Push on the bottom of your bag-a-lope with your other hand until you see your "cat ears" appearing. Once you have your cat ears you need to apply adhesive to them and stick them down. Push the sides of your bag in and you are done. You are now ready to put a band on it (or you can make a topper for it like we did for our M & M bags).
Saturday, October 4, 2008
Mommy and Me
I had my first official camp today and I think it was a lot of fun. I hope that everyone who attended had a great time as well as their kids. I had a lot of fun sharing my love for stamping with them. Thank you all for being my first guests and I hope we can do it again!! I will be posting my projects as soon as I get a chance as well as the instructions. If you need the instructions before I post them, just send me an email and I will let you know how to do whatever project you need. Thanks again for coming!!
Wednesday, October 1, 2008
Orders
Hey there gals. Your orders are in and I'm getting ready to go through them and sort them out as I type. You can pick them up whenever you would like. Just let me know!!
Candi
Candi
Subscribe to:
Posts (Atom)